Virtualization-Based Edge Deployment · Pub/Sub Payload Limit Workaround · Idempotency-Based Consistency
Overcoming pilot site surprises and cloud limitations in MDE optimization
Cloud Tech Unit · GCP Delivery SA 3 Yoon Sung-jae | 2026-02-23
Problem Definition — Engineering in the Trenches
No matter how perfect an architecture diagram looks, it often falls apart in front of rack-mount servers and network cables at a manufacturing site. While the previous article covered the “elegant” architecture, this one dives into the mud-and-guts troubleshooting that field engineers had to wrestle through during the pilot phase.
This article shares three intense problem-solving stories recorded in the pilot operations report, without any sugarcoating.
Challenge 1: Hardware Compatibility and the Nightmare of Edge Deployment
Bare Metal Multi-Disk (RAID) Volume Configuration Constraints
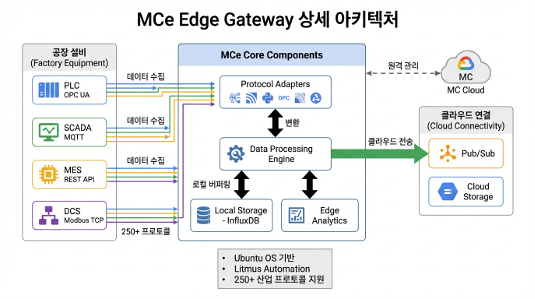
This problem emerged when attempting to install the MCe (Manufacturing Connect Edge) OS directly on Dell physical servers (bare metal) deployed at factory sites.
The Dell servers on-site were configured with two logical drives (partitions): an OS area (2 mirrored disks) and a data storage area (4 disks in RAID 5) for enterprise-grade reliability and capacity. However, the MCe official deployment image only supported single-partition (Single Volume) configurations during installation. As a result, MCe could not accommodate the two-partition storage architecture of the field servers, making direct bare metal installation impossible.
Hardware Decoupling Through Virtualization
To solve the hardware partition constraint through software, we pivoted from direct bare metal installation to a strategy of inserting a virtualization layer.
- We first installed Ubuntu OS on the physical server — an OS with excellent multi-partition and hardware driver compatibility — to hand hardware control over to a general-purpose OS.
- On top of that, we set up a VirtualBox-based virtual environment and deployed the MCe image to a virtual machine (VM) with a single virtual disk allocated.
This workaround not only broke through the initial setup constraint but also delivered excellent operational resilience — enabling system rollback in just 5 minutes via VM snapshots when edge issues arose.
Challenge 2: Overcoming Large Data Processing Limits and the Pub/Sub Payload Restriction
Edge OOM (Out of Memory) and Physical Cloud Limits
Factory data isn’t just sensor logs. The collection targets included massive CSV files exceeding 2GB per file, high-resolution quality inspection images (JPG, BMP, PNG), and process videos (MPG, MP4).
We hit two physical limits here. First, following the initial standard pipeline flow and attempting to load and serialize 2GB+ CSV files into memory at once caused OOM (Out of Memory) on the MCe edge. Second, Google Cloud Pub/Sub has a maximum message size (Payload Limit) of 10MB, making it architecturally impossible to push large data directly through streaming.
Two-Track Resolution Strategy: Chunking and Claim-Check
To resolve this, we took a two-track strategy that modified both edge-level data processing and the cloud transmission architecture.
1. Chunk-Based Split Loading at MCe Level
For CSV files exceeding 2GB, we abandoned the existing approach of loading the entire file into memory at once. Instead, within the MCe collection flow, we split files into multiple small chunks and processed them incrementally, eliminating the edge OOM problem at its root.
2. Applying the Claim-Check Architecture Pattern
We applied the Claim-Check pattern — a standard architecture for handling large payloads in cloud messaging environments — to split the pipeline flow into two tracks.
| Data Type | Size | Transmission Path | Behavior |
|---|---|---|---|
| Telemetry (Sensors) | Under 10MB | MCe → Pub/Sub | Standard JSON serialization with real-time streaming |
| Large Files (High-res images, Video) | Over 10MB | MCe → GCS | Original files uploaded directly to Cloud Storage (GCS) buckets |
For large files, the edge sends only a lightweight message (Claim-Check Token) of a few KB containing “the GCS file path (URI) and metadata” to Pub/Sub, instead of the actual data. When Dataflow subscribes to this message, it references the URI to read data directly from GCS in parallel, completely eliminating the Pub/Sub network bottleneck.
Challenge 3: The Data Consistency Dilemma (Why Don’t the Numbers Match?)
The Situation: A Data Engineer’s Nightmare
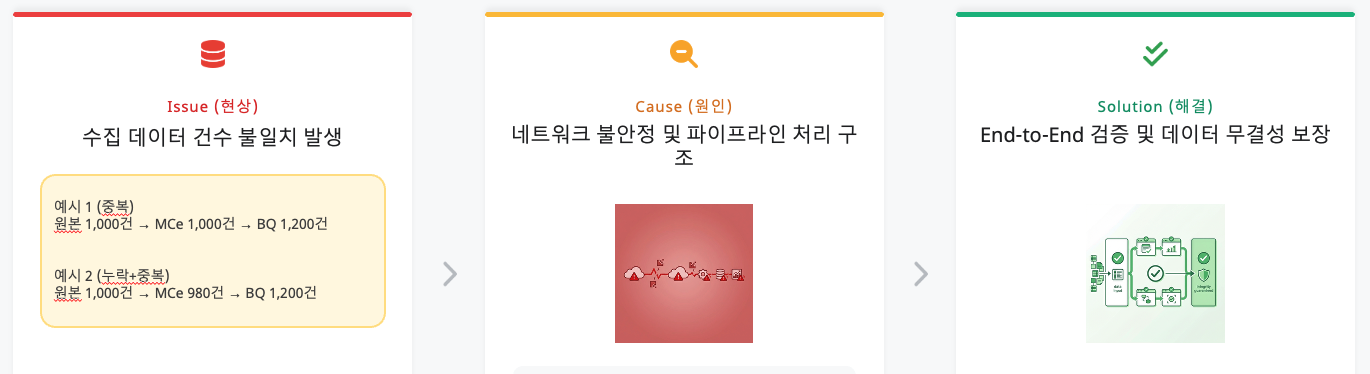
The issue that plagued us until the very end was “data count mismatch.”
Example: The source CSV file has 1,000 rows, but only 980 records are stored at the edge (InfluxDB) (missing), while 1,200 records are loaded at the final destination BigQuery (duplicated).
Root Cause Analysis: The Duet of Duplication and Loss
Debugging revealed that the data inflation and shrinkage had different causes.
1. Cause of Duplication: BigQuery and Manual Intervention
BigQuery has a characteristic of unconditionally appending data (Append-only) without checking for duplicates upon ingestion. On top of this, engineers manually injected data into Pub/Sub and repeatedly ran retransmission tests for pipeline verification, physically inflating the data volume.
2. Cause of Loss: Source Data Duplicates and MC’s Filtering
The more serious problem was the “missing data.” Analysis revealed that the original CSV files provided by the field actually contained duplicate data with identical timestamps and values. MC (Manufacturing Connect) edge correctly identified these as “identical data” and filtered (dropped) them to prevent duplicate transmission. The system was working correctly, but the mismatch between the physical line count of the source file and the loaded data count created the false impression of “missing” data.
Resolution Approach: DLQ and Idempotency Guarantees
To address these consistency issues, we established a strategy leveraging the Dead Letter Queue (DLQ) functionality and idempotency guarantee options provided by the MDE solution.
- UUID-Based Idempotency: Assigning a unique ID (UUID) at data creation time ensures that even if the same data is retransmitted, duplicate loading is prevented.
- Error Isolation via DLQ: Failed data is routed to a separate queue, protecting the main pipeline’s consistency while providing a safety net for subsequent analysis and reprocessing.
- BigQuery Deduplication: Post-load
MERGEorROW_NUMBER()-based deduplication queries guarantee the uniqueness of the final data.
Key Lessons
This PoC was about moving a massive 279TB of data to the cloud, but for me, it was a time to witness how architectures drawn at a desk crumble and are rebuilt in the field’s trenches. Here are three lessons learned from this project.
Field Hardware Always Defies Expectations (Flexibility over Performance)
The complacent assumption that “it’s a standard server, so of course it’ll install fine” shattered in front of legacy RAID controllers at the factory. In the engineering world, bare metal performance optimization is appealing, but in edge environments where variables are uncontrolled, “flexibility” is “survival.” Adding a single virtualization layer is not overhead — it is the most reliable insurance protecting software from unpredictable hardware issues.
Real Design Begins When You Accept Cloud Limitations (Design for Limits)
Even seemingly infinite cloud resources have physical limits (quotas). When facing Pub/Sub’s 10MB limit or edge device memory shortages (OOM), simply requesting more capacity is an amateur move. We acknowledged these constraints and found detours through architecture patterns like Claim-Check and Chunking. True engineering shines not in constraint-free environments, but when finding optimal solutions within constraints.
Consistency Is the First Button of Design (Consistency First)
In large-scale data pipelines, consistency is not an add-on — it is a core design element. When source data duplicates or artifacts from manual testing processes mix in, data reliability drops sharply. Data integrity verification should not be “post-processing” but “the first button of design.” Embedding idempotency guarantees and DLQ design into the pipeline core is the critical factor determining the success of a 279TB-scale collection system.
This PoC built a “massive, robust pipeline” through which rough heterogeneous data can flow, along with data consistency safeguards based on idempotency and DLQ. Building on this experience, reliably supplying first-class data (High-Quality Data) that AI models can confidently consume is the ultimate goal of the manufacturing AI pipeline.
Appendix: Manufacturing Connect Edge (MCE) Installation and Configuration Guide
Please note that this guide is a setup method specific to the PINN PoC project (Korea), designed to address the installation difficulty of bare metal servers. The installation steps for actual production environments may differ.
Installing MC (Manufacturing Connect) and MCE requires significant preparation including physical hardware, cloud environment, and budget, which can make actual installation and testing quite challenging. We hope the process outlined below helps in understanding the overall workflow.
The disk configuration is as follows:
/dev/sda: 300GB. RAID 1 (Mirroring) configuration. Ubuntu OS installation area./dev/sdb: 32TB. RAID 5 configuration. InfluxDB data storage area.
Ubuntu Linux Installation and Network Configuration
The first step is to install the base operating system Ubuntu and configure the network.
- OS Installation: Select “Try or Install Ubuntu” via a bootable USB to proceed with installation.
- Network Configuration: Configure IP, gateway, subnet mask, and DNS in ‘Advanced Network Connection.’
- Firewall Activation: Enable the UFW firewall for security.
# Enable firewall
sudo ufw enable
System Update and Data Disk Formatting (32TB)
Keep the system up to date and partition the large hard drive.
# System update
sudo apt update

# Check disks and remove existing partitions
sudo lsblk
sudo wipefs -a /dev/sdb
sudo sgdisk --zap-all /dev/sdb

# Create GPT partition (using Parted)
sudo parted /dev/sdb
# (After entering parted prompt)
mklabel gpt
mkpart primary ext4 0% 100%
print
quit

# Format filesystem (EXT4 or XFS if needed)
sudo mkfs.ext4 /dev/sdb1
# Or sudo mkfs.xfs /dev/sdb1

# Mount and configure auto-mount
sudo mkdir -p /mnt/data
sudo mount /dev/sdb1 /mnt/data

# Check UUID and add to /etc/fstab for auto-mount on reboot
sudo blkid /dev/sdb1
# Example: UUID=abcd-1234 /mnt/data ext4 defaults 0 2
VirtualBox Installation and KVM Deactivation
Since MCE runs in a virtual environment, VirtualBox must be installed. At this point, KVM modules must be deactivated to prevent conflicts.
# Install VirtualBox
sudo apt install virtualbox

# Remove KVM module from current session (for Intel CPUs)
sudo modprobe -r kvm_intel

# Add permanent KVM blacklist
sudo nano /etc/modprobe.d/kvm.conf
# Enter 'blacklist kvm_intel' inside the file and save

# Update kernel image and reboot
sudo update-initramfs -u -k all
sudo reboot
MCE (Manufacturing Connect Edge) Installation and Auto-Start Configuration
After installing MCE via an ISO image, configure the VM to start automatically when the server reboots.
- Installation Guide: Refer to the Litmus Edge VirtualBox installation documentation.
- Auto-Start Configuration: Add the following command to the ‘Startup Applications’ utility.
# VM auto-start command (Headless mode recommended)
VBoxManage startvm "your_VM_name" --type headless
Host Configuration and MC Activation
Configure the domain and IP settings for accessing the management console (MC).
- Add
mz.co.krto the/etc/hostsfile. - Access
mz.co.krand change the password. - In Admin UI > Settings > Entry Points, change the domain to MC’s private IP (takes approximately 8 minutes to take effect).
- Upload the JSON SA key and activate MCE.
Final Verification
Once all settings are complete, reboot the server and verify the following:
- Does MCE (Manufacturing Connect Edge) boot automatically?
